Showing 1–9 of 29 results

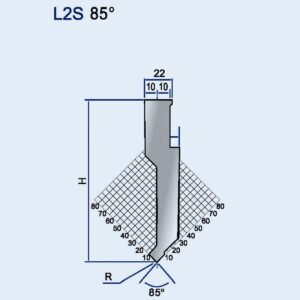
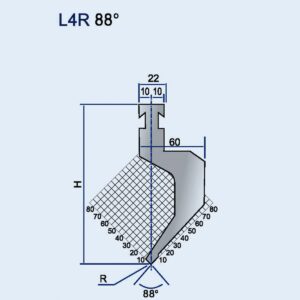
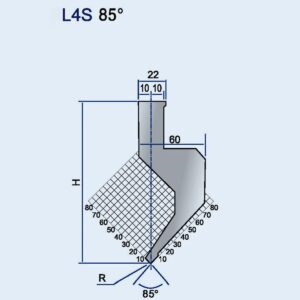
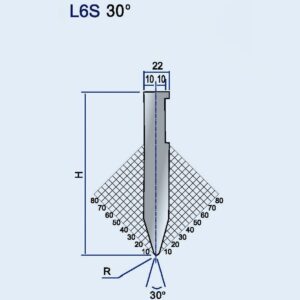
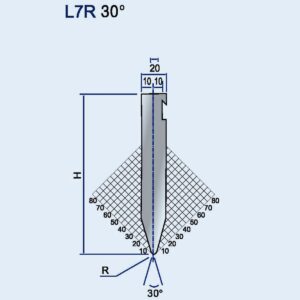
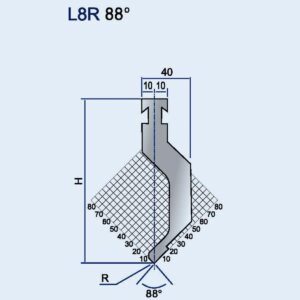
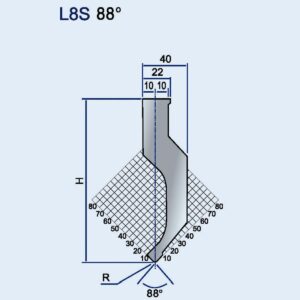
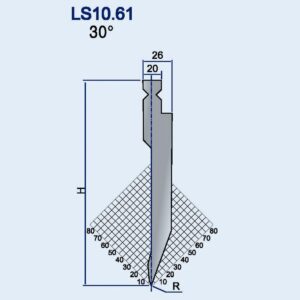
Press Brake Punch, Euro Press Brake Tooling
Press Brake Punch, Euro Press Brake Tooling
Press Brake Punch, Euro Press Brake Tooling
Press Brake Punch, Euro Press Brake Tooling
Press Brake Punch, Euro Press Brake Tooling
Press Brake Punch, Euro Press Brake Tooling
Press Brake Punch, Euro Press Brake Tooling
Press Brake Punch, Euro Press Brake Tooling
Press Brake Punch, Euro Press Brake Tooling
A mere 0.3mm difference may be imperceptible to the human eye, but on a press brake it can spell disaster. This tiny gap separates the 12.7mm (0.5-inch) American tang from the 13mm European tang. Forcing mismatched tooling into the wrong beam doesn’t just compromise accuracy—it can irreparably damage the clamping system or cause a die to fracture under load. Knowing the distinctions between the three main standards—American, European, and New Standard—is not just theory; it’s essential for preventing costly missteps and unlocking your machine’s full precision potential.
European-style tooling didn’t dominate by accident—it rose to prominence through a deliberate transformation in manufacturing principles sparked by Promecam (later acquired by Amada). To see why Euro style became synonymous with accuracy, we need to examine the origins of the traditional American style.
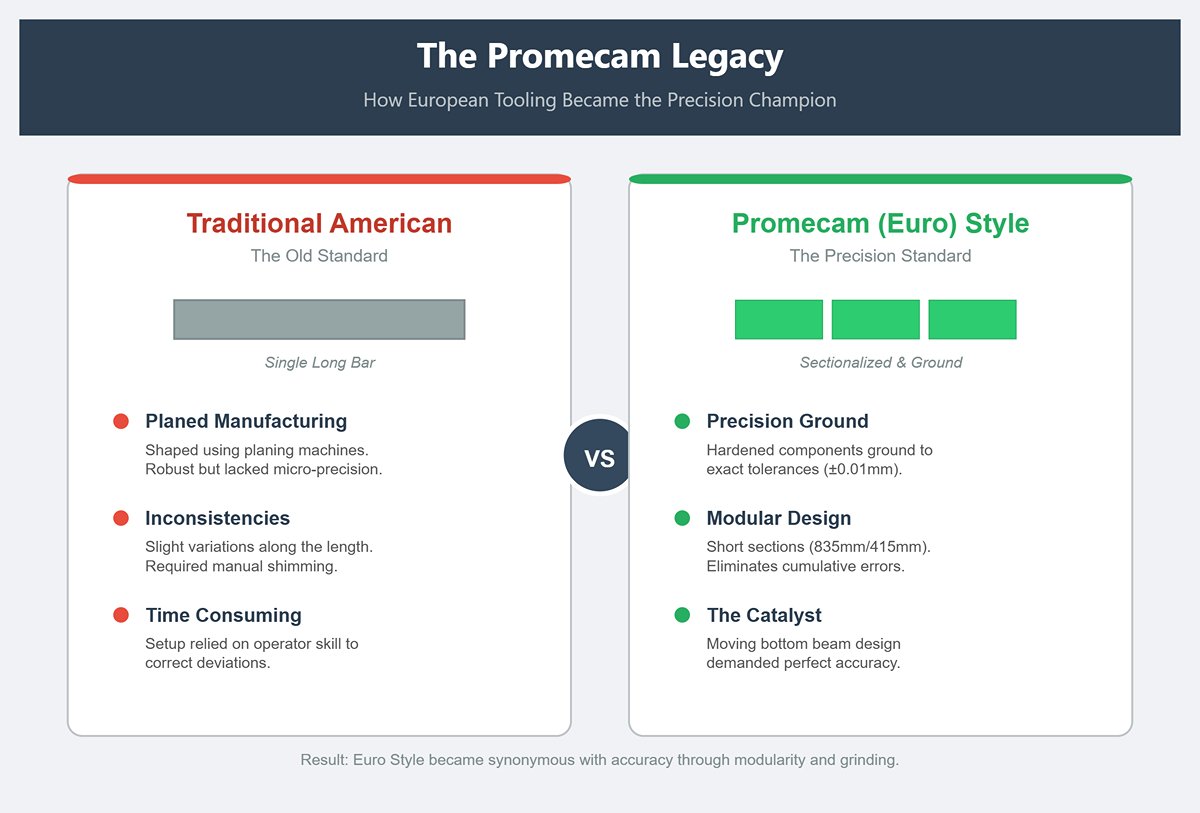
Historically, American tooling was planed. Manufacturers shaped long bars of steel using planing machines. While this approach produced robust tools, it introduced slight inconsistencies along the tool’s length. Achieving a perfectly straight bend required operators to painstakingly adjust and shim the dies—a skilled but time-consuming manual process.
Promecam broke with tradition, developing press brakes with a distinctive “moving bottom beam” and a centralized hydraulic system. This allowed the machine to naturally counteract beam deflection under load—without relying on elaborate Press Brake Crowning mechanisms. The catch: this design demanded tooling of near-perfect precision. Planed steel simply couldn’t deliver the required accuracy.
Their answer was Precision Ground tooling. Promecam pioneered the use of sectionalized, hardened, and ground components instead of single long planed bars. Producing shorter modules (such as 835mm or 415mm sections) ground to exact tolerances of ±0.01mm eliminated the cumulative measurement errors of lengthy bars. This modular construction also meant that damage to a small section could be remedied by replacing only that piece—saving cost and time. This fusion of durability, interchangeability, and ultra-fine grinding tolerances is why “Euro Style” emerged as the definitive standard for precision.
When you’re facing a rack filled with different Press Brake Toolings styles, you don’t need precision measuring tools to figure out their heritage. Simply focus on the tang—the “neck” of the tool—and the built‑in safety features.
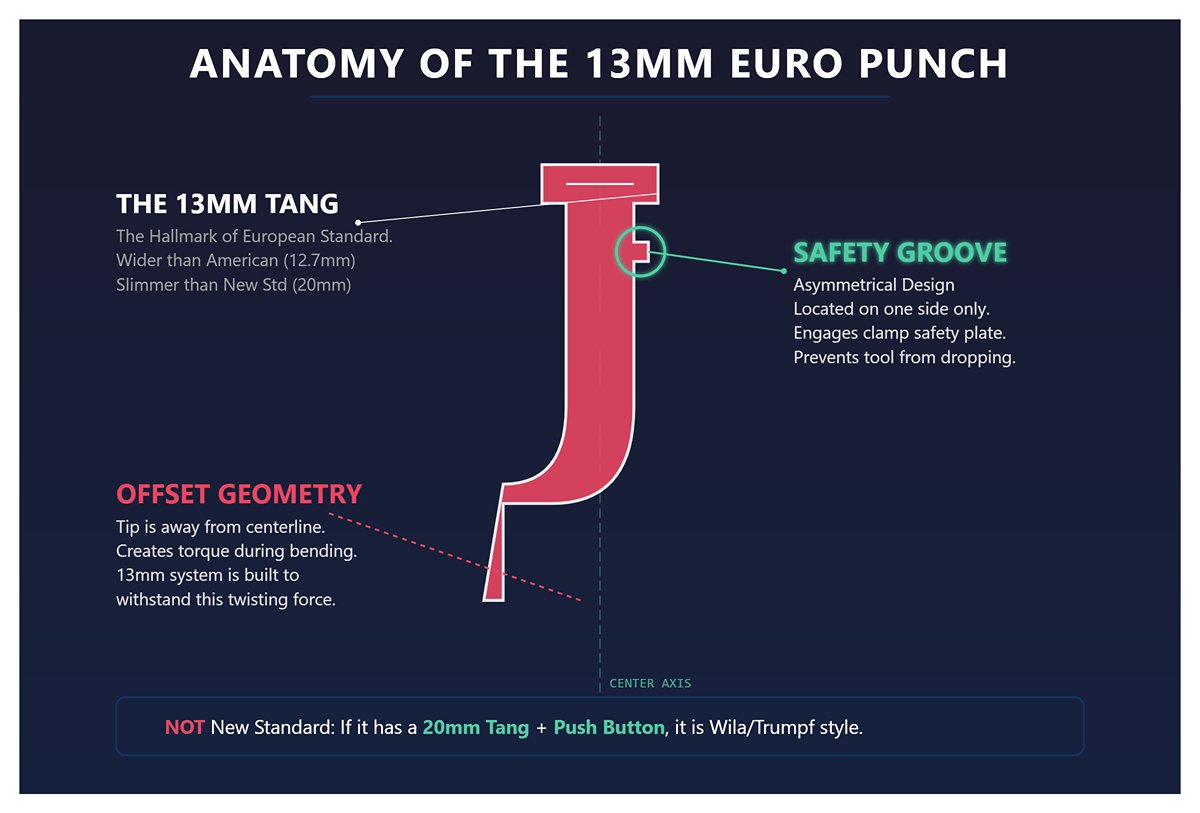
The 13 mm Tang: This is the unmistakable hallmark of the European standard. It’s marginally wider than the American 0.5‑inch (12.7 mm) tang, yet noticeably slimmer than the 20 mm New Standard variant.
The Safety Tang (Offset Design): In contrast to American tooling, which typically uses a plain hook or flat tang, European punches incorporate a distinctive safety groove on the head. Most notably, this groove is asymmetrical—you’ll usually find it on just one side of the tang.
Identifying the New Standard: A punch with a 20 mm wide tang combined with a push‑button latch (Safety Click) or an integrated spring‑loaded pin is a clear indicator you’re dealing with the Wila Press Brake Tooling or Trumpf Press Brake Tooling, not the Euro profile.
Today’s shop floors often host a mix of equipment brands, creating a tricky web of compatibility considerations.
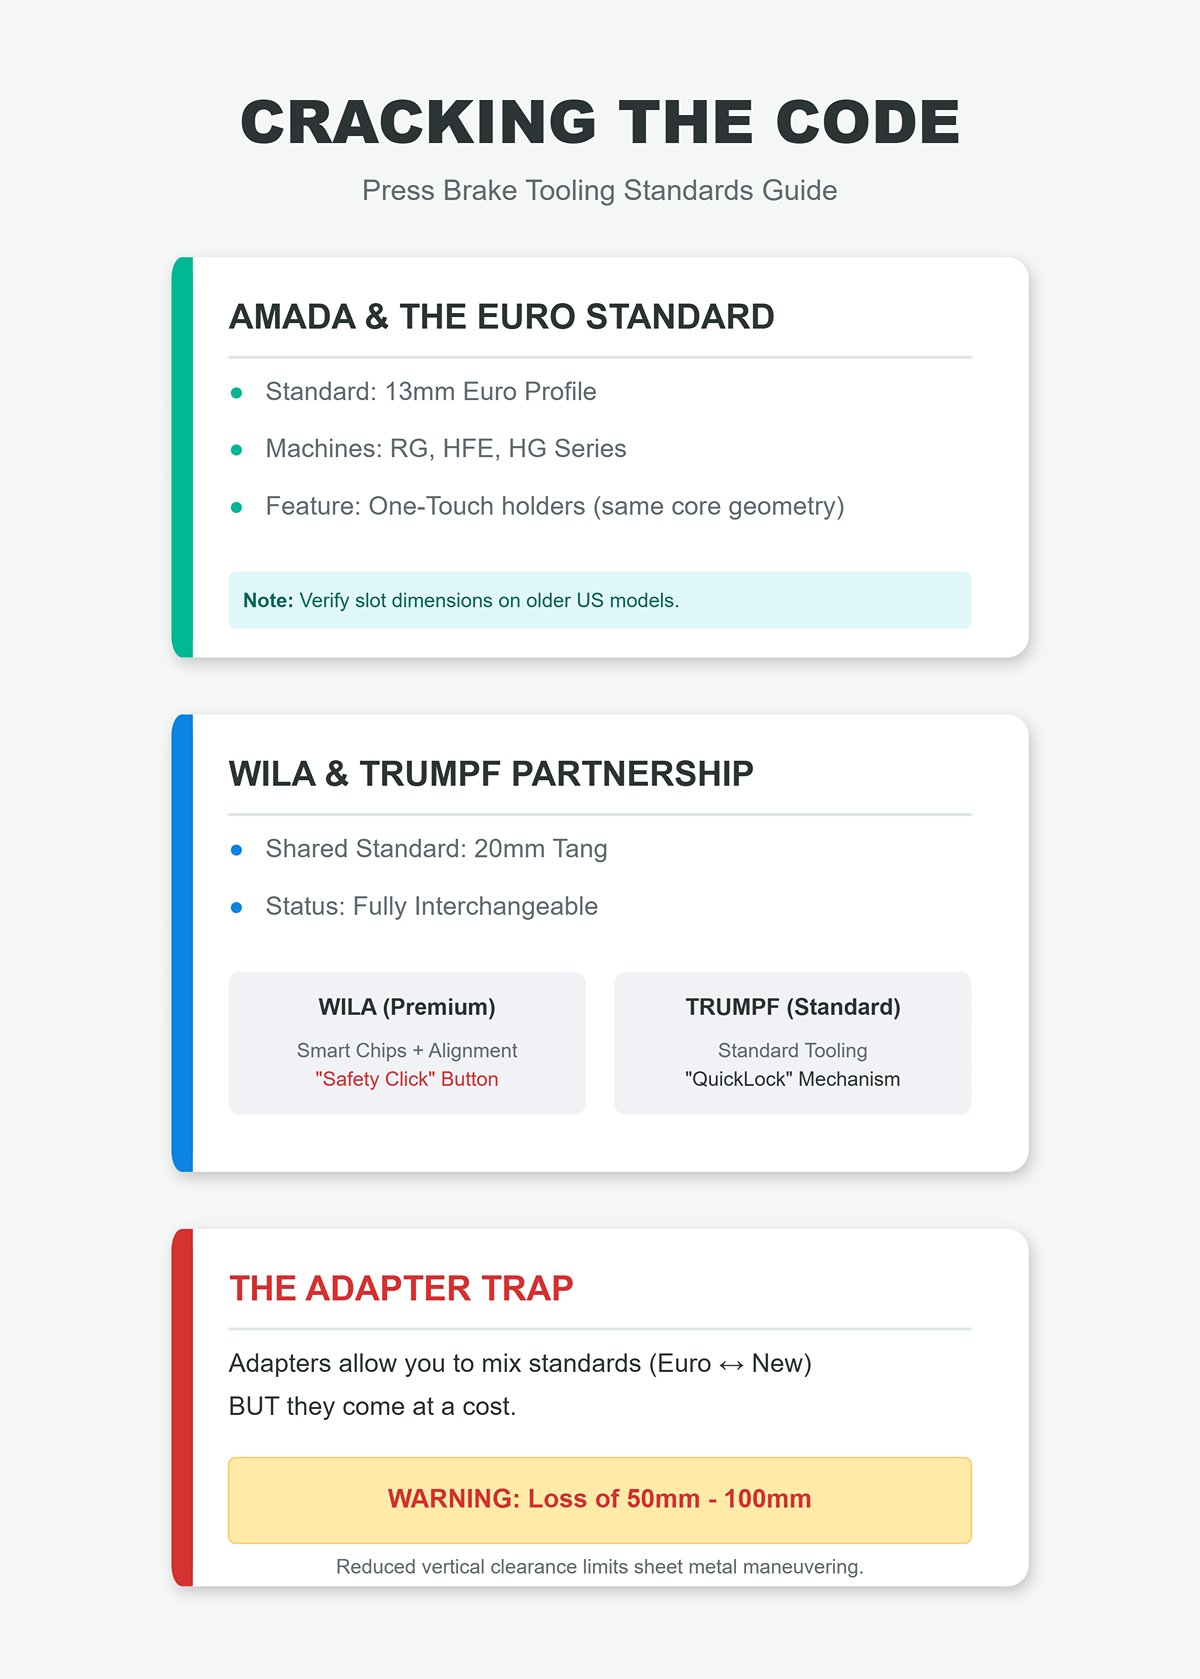
Amada and the Euro Standard: Amada carries forward the Promecam tradition. Machines from the RG, HFE, and HG series are designed for the 13 mm Euro Standard. Even with Amada’s introduction of quick‑change “One‑Touch” holders, the core geometry remains that 13 mm profile.
Wila and Trumpf—the New Standard Partnership: Wila originated the “New Standard” design, which Trumpf adopted extensively across its tooling systems.
The Adapter Trap: You can purchase adapters to bridge these tooling standards—for example, a block that allows 13mm Euro tooling to be used in a New Standard machine, or the reverse.
Ask an experienced press brake operator why they favor European-style tooling—be it Promecam or the modern Wila/Trumpf New Standard—over traditional American designs, and they probably won’t mention metallurgy or looks. Instead, they’ll talk about eliminating the dreaded “test bend.”
With traditional American planed tooling, the first bend is almost always a trial run. The operator bends, measures, adjusts the ram depth, shims the die, and bends again. Many shops consider this routine unavoidable, but it’s actually a consequence of outdated tool geometry. Euro-style tooling prevails in accuracy not only through virtually flawless manufacturing tolerances (often ±0.01mm), but also by employing design principles that inherently eliminate sources of cumulative error.
Switching to Euro tooling elevates the press brake from a machine reliant on operator “feel” to a true precision instrument governed by exact calculations. The mechanical design of the tooling is what makes this transformation possible. For advanced setups, Standard Press Brake Tooling can also be an option.
One of the recurring headaches with conventional American tooling is the bend line “drift” that occurs when a punch is flipped. Because these tools were traditionally made using planing—an approach that often left the tool tip’s centerline slightly misaligned with the mounting tang’s centerline—reversing the tool can cause positional errors. For instance, an operator might set the backgauge for a forward-facing punch, then rotate it 180 degrees to clear a flange. Even though the machine registers the punch as unchanged, the tip’s location has actually moved by 0.5 mm or more, shifting the bend line and affecting accuracy.
Euro-style tooling—especially precision-ground designs—is made according to a strict centerline standard. Both the punch tip and the mounting tang are ground in one setup or precisely referenced to ensure perfect symmetry.
This symmetry creates a true “plug-and-play” relationship with the backgauge. In CNC systems, the X-axis position is determined from the ram’s theoretical center. Because Euro tooling holds that centerline constant regardless of orientation—in reversible systems like the New Standard—the operator can flip punches to suit complex part geometries without reprogramming the backgauge. The physical tip’s location precisely matches the controller’s expectations, removing the need for X-axis adjustments or trial bends.
Shimming is one of the biggest wastes of setup time in metal fabrication. With traditional tooling, the punch either rests on the tang base or hangs loosely in the clamp. Because planed tang heights are often inconsistent, a 10-foot setup made from four tool sections might have each section at a slightly different working height. To achieve a uniform bend, operators must place thin strips of paper or brass under the shorter sections to level them.
Euro tooling removes this problem entirely by incorporating Shoulder Load geometry.
It’s similar to the difference between a gymnast doing a pull-up and a person standing on uneven ground. Traditional punches “stand” on the bottom surface of the holder; if that surface—the tang—is uneven, the tip ends up uneven too. Euro punches, by contrast, feature precision-ground “shoulders” (sometimes called safety ears) that function like the gymnast’s arms, ensuring consistent alignment regardless of tang irregularities.
Once the clamp engages—whether operated manually or via hydraulics—it pulls the tooling upward until the precision-machined shoulders make firm contact with the reference face on the clamp or beam. In this design, bend accuracy is determined not by the tang height but by the “Head Height,” measured from the shoulder to the tool tip. Because this dimension is ground to micron-level tolerances, every section of tooling seats at precisely the same height automatically. The outcome is a perfectly aligned bend line along the full length of the bed, completely eliminating the need for shimming.
The distinction between sliding tools into place and loading them vertically boils down to straightforward physics and on-the-floor safety. Traditional long-planed tooling requires being slid in laterally from one end of the press brake. This creates two significant issues: friction and what’s nicknamed the “guillotine effect.” Maneuvering a massive, hardened 10-foot steel bar involves considerable effort and clearance space on both sides of the machine. Far more dangerous, if a segmented American-style tool is unclamped without proper support, it can drop instantly, posing a serious hazard that has led to numerous workplace injuries.
European tooling employs a modular, vertically loaded system that dramatically changes the equation for setup time.
This capability is a game-changer for “High-Mix, Low-Volume” jobs. An operator working on a complex part with multiple bend stations can snap each segment into place in order within seconds. Research indicates that the transition from horizontal sliding to vertical loading can cut total setup time by 50% to 80%. Every minute the press brake sits idle during setup is a minute it’s not earning—vertical loading keeps the brake working longer and reduces downtime from wrestling steel into position.
| Aspect | Horizontal Sliding (Traditional) | Vertical Loading (European) |
|---|---|---|
| Method | Tooling slid laterally from one end of the press brake | Tooling loaded from below into the holder |
| Key Issues | High friction; requires large clearance space; risk of “guillotine effect” if unclamped without support | None of the sliding friction issues; safer locking mechanism |
| Safety Concerns | Heavy tools can drop suddenly, causing serious injuries | Spring-loaded latch/safety tang locks tool with a “click” before clamp is engaged, preventing drops |
| Setup Process | Requires maneuvering long steel bars past multiple stations | Directly place specific segments where needed without sliding past other stations |
| Speed | Slower; setup involves moving tooling along the entire bed | Faster; bypasses sliding and allows segment-by-segment placement |
| Suitability | Less efficient for varied, complex jobs | Ideal for “High-Mix, Low-Volume” production |
| Efficiency Gain | No significant reduction in setup time | Reduces setup time by 50%–80%, increasing machine uptime |
In industry discussions, Euro-style precision-ground tooling is often portrayed as the inevitable next step for any modern shop—a one-size-fits-all upgrade. This assumption can be dangerously misleading. Although Euro tooling delivers exceptional speed and accuracy for sheet metal work, assuming it can directly replace traditional planed tooling in heavy-duty fabrication is a critical mistake.
We refer to this mistake as the “Tonnage Trap.” Transitioning to a European tooling system without fully grasping its load-bearing design isn’t just a recipe for potential tool failure—it can cause serious, costly, and permanent damage to the press brake itself. Before retiring your American-style planed tools, you must carefully assess whether your workload and methods conflict with the physical principles on which Euro tooling is built.
The chief constraint of Euro tooling isn’t its steel hardness—it’s the geometry of its contact area. To appreciate this, it’s essential to understand how the force from the press brake’s ram is transmitted to the tool.
Traditional American planed tooling functions like a heavy-haul truck: its wide tangs and broad bases spread immense vertical loading across a generous surface area. This design is meant to withstand the substantial force needed to bend plate as thick as 0.25 inches (6mm) and beyond, prioritizing sheer structural strength over precision alignment.
By contrast, Euro tooling is the industry’s equivalent of a Formula 1 race car. Its finely ground contact surfaces are engineered for perfect precision but come with a far narrower profile. The crucial vulnerability lies in the shoulder of the punch. In Euro systems, the load is concentrated on these slim shoulders rather than being distributed over a wide base.
Applying high tonnage—specifically loads exceeding 100 tons per meter—to such narrow shoulders causes the pressure (Force ÷ Area) to rise sharply. Once that pressure surpasses the yield strength of the press brake’s upper beam, the consequences are severe: instead of merely breaking, the tooling can sink into the ram itself, leaving a lasting indentation that destroys the machine’s reference surface for all future bends. Euro tooling is meticulously designed for precision sheet work (typically under 4mm thick), not for the sheer force demanded by structural plate bending.
The second factor in what we call the “Tonnage Trap” comes down to the bending method itself. Heavy plate fabricators often use bottoming or coining—driving the punch firmly into the die to lock in the angle and minimize springback. If that’s your standard production method, Euro-style tooling is probably not the right fit.
In these situations, the component that fails most often isn’t the punch—it’s the clamping system, also known as the holder.
Euro holders—especially those with intermediate holders—are intricate assemblies featuring wedges for crowning compensation and fine adjustment screws. They’re engineered to handle vertical load transmission. When bottoming introduces major side thrust, it creates shearing forces that these precision components simply weren’t built to absorb.
It’s common to see heavy plate fabricators break adjustment screws or crack clamp bodies in Euro holders when attempting to bottom-bend thick material. If your work demands bottoming to achieve tight internal radii on heavy sections, you need the solid, monolithic build of American-style tooling or purpose-built heavy-duty holders—not the finely tuned adjustability of a standard Euro setup.
Ultimately, any switch in tooling should consider the metallurgical makeup of the tools—their “core,” which determines how they wear and how they fail. The way a tool is manufactured essentially defines the applications it’s suited for.
Euro tooling is specifically engineered for Air Bending, where wear is mostly confined to the punch tip and die radii (points of contact). To counteract this, premium Euro tools—often made from 42CrMo4 Chromoly—undergo CNC deep hardening or laser hardening, producing surface hardness of 54–60 HRC that extends 2–3mm below the surface.
These tools can often be recognized by the distinctive black layer on their working surfaces. This is not simple paint—it’s the heat-affected zone created during hardening. While it delivers exceptional resistance to abrasive wear, it comes with a drawback: increased brittleness.
Here lies the hidden hazard: a laser-hardened Euro tool reacts much like glass when subjected to sudden impact. If you employ it for coining—which demands high impact resilience—or if it suffers an accidental crash, unlike a softer American planed tool that would merely dent or bend, the Euro tool can fracture catastrophically, sending dangerous fragments flying.
Key Takeaway:
Never expect a finely tuned precision instrument to perform the brute-force work of a sledgehammer.
| Bending Method & Tooling Type | Metallurgy & Manufacturing | Wear Resistance | Impact Resilience | Recommended Use Cases | Hazards |
|---|---|---|---|---|---|
| Air Bending – Euro Tooling | Often made from 42CrMo4 Chromoly; CNC deep hardened or laser hardened to 54–60 HRC, hardness extends 2–3mm below surface; black heat-affected zone on working surfaces | Exceptional resistance to abrasive wear (especially at punch tip and die radii) | Lower resilience; increased brittleness, prone to fracture under sudden impact | Precise gauges under 4mm, rapid tooling changes, high wear resistance required | Can fracture catastrophically if used for coining or in crash situations; dangerous flying fragments possible |
| Coining – American/Planed Tooling | Softer core metallurgy; designed for toughness rather than extreme hardness | Moderate wear resistance | High resilience; can dent or bend instead of fracture | Stock thicker than 6mm, bottoming or coining techniques, heavy impact load applications | Less wear resistance compared to hardened Euro tooling |
You recognize the precision advantages of Euro tooling, but browsing the catalog can feel like walking through a minefield. With thousands of profiles available, newcomers often make the costly mistake of buying an extensive collection of steel that ends up sitting unused on a rack.
Your goal isn’t to stock every possible size, but to cover the widest range of bending tasks with the smallest practical investment. This means shifting your mindset from acquiring “dimensions” to acquiring “capabilities.”
The most expensive paperweight in any fabrication shop is a precision gooseneck punch that fits into your press brake but leaves no clearance to insert the workpiece. Before committing to a purchase, conduct precise dimensional checks on your machine.
Don’t rely solely on the stated Open Height. You must determine the Effective Daylight—the usable space remaining after your tooling is in place. Apply this formula before selecting from the catalog:
Remaining Daylight = Open Height – (Total Punch Height + Total Die Height + Adapter/Clamp Height)
The Hidden Cost of Adapters: If converting an American-style press brake to accept Euro tooling, you’ll likely need a transition adapter or new clamping beam. These components typically consume 80mm to 120mm of your available vertical space. On machines with limited open height, combining an adapter with a tall gooseneck punch could leave a clearance too tight for practical part handling.
The Shut Height Pitfall On the flip side, be aware of your machine’s Minimum Shut Height. If you equip a deep-stroke press brake with standard short-body European punches (H = 67mm), you risk the ram bottoming out before the punch tip contacts the die. In effect, your tooling will be too short to function properly. That means you’d have to invest later in extenders or taller punches—blowing apart your carefully planned budget.
Quick Win: Before placing any tool order, ask your supplier for a “stack‑up drawing”. This should overlay the exact punch, die, and holder dimensions onto your machine’s schematic. Double-check that there’s at least 100mm of usable space between the punch tip and the top of the V-die—enough room to comfortably position and manipulate your workpieces.
In a typical job shop bending 1mm–6mm carbon or stainless steel, you don’t need every possible V‑die size. With a focused “golden kit,” you can handle around 90% of jobs efficiently.
The Four Must‑Have V‑Dies: Apply the V = 8T guideline (V‑opening is eight times the material thickness), but streamline your tooling to four essential sizes:
Smart Purchasing Tip: Opt for self‑centering double‑V dies. For example, a single rail with both V10 and V16 openings lets you switch between 1mm and 2mm setups simply by flipping the die—halving your tooling costs and trimming down the space needed for storage.
The Two Indispensable Punches
The “Magic Math” Behind Sectionalized Tooling
Never limit yourself to buying top punches only as solid, full-length bars. Instead, invest in at least one segmented set—often referred to as “ear pieces” or “horns.” Standard segmentation sizes (10, 15, 20, 40, 50, 100, 200mm, etc.) allow you to assemble virtually any length in 5mm increments. This modular flexibility means the same set can form a 45mm bracket just as easily as an 855mm panel, without ever needing to cut or modify your tooling.
For older machines, switching to a Euro-style quick-clamp system typically requires an initial investment of $3,000 to $8,000, depending on the bed length. Is this merely a convenience or a strategic upgrade? The answer depends entirely on how often you change tooling.
Calculating ROICompare the time required for a traditional tooling setup versus a Euro-style quick-clamp system:
If your shop averages just two changeovers a day, that’s 70 minutes saved daily. Valued at a conservative machine rate of $60/hour, this equates to $70 in recovered time every day.
$5,000 Initial Cost ÷ $70 Daily Savings ≈ 71 Days
The Verdict: Unless your press brake is tied to a single product for months at a stretch, a quick-clamp retrofit generally pays for itself in under three months. And that’s without factoring in the reduced scrap from the superior accuracy of Euro self-seating clamps.
When starting from scratch, keep your initial kit lean yet versatile. A segmented 88° gooseneck punch paired with a V16/V24 double-V die will enable you to accept the bulk of new job requests—and generate the revenue to grow your tooling library over time. For more product references, download our Brochures or Contact us for tailored recommendations.
Beyond the usual discussions around compatibility and precision, there are three “hidden profit drains” that silently erode sheet metal shop margins. These aren’t minor inefficiencies—they’re mechanical mismatches that damage your equipment and dismantle your ROI. Fixing them isn’t about spending more; it’s about stopping unnecessary losses.
One of the most common cost-cutting tactics shops attempt is upgrading to precision Euro‑style punches while continuing to use their old “American” planed dies in the lower holder. On paper, it looks like a budget win. In reality, it’s more like fitting a Ferrari with tractor tires—completely mismatched and ultimately damaging.
The Hardness Mismatch: Euro‑style punches are generally laser or induction hardened to about 55–60 HRC, while traditional American planed dies are usually pre‑hardened steel at roughly 28–32 HRC. Under load, the harder Euro punch essentially acts like a cutting tool against the softer American die. Over time, this gouges grooves into the die’s shoulders, permanently compromising bend angle consistency. Operators are then forced to shim dies or constantly tweak ram settings—wasting valuable setup time.
The Alignment Clash: The two systems are designed to reference different points—Euro tooling aligns by the shoulders, while American tooling aligns via the stem or bottom of the slot. When you mix them, conflicting alignment centers create side‑load torque with every stroke as the tools attempt to self‑center. This not only accelerates wear on the tooling but also shortens the lifespan of your press brake’s main cylinder seals and gibs.
The Fix: If you move to Euro punches, match them with Euro dies. The investment in a compatible set is minimal compared to the expense of rebuilding hydraulic components.
The knee‑jerk reaction when buying a new press brake is to order the “standard 3‑meter tooling set.” It’s a capital drain, rooted in flawed assumptions about how work actually moves through a job shop.
The Pareto Principle in Action: In a typical high‑mix environment, 20% of your tooling will accomplish 80% of your jobs. Buying a solid 3‑meter bar leads to two costly issues. First, bending something like a 500mm box forces you to cut the bar—introducing heat‑affected zones and inaccuracies—or to purchase separate segments. Second, consistently using the middle of a long tool for short parts wears out that section (and the corresponding area of the machine bed) while the ends remain unused. Over time, this “banana” effect prevents you from achieving straight bends on full‑length parts.
The Segmented Approach: Unless your work exclusively involves bending full 3-meter panels, avoid investing in solid, full-length tools. Opt instead for sectional tooling. While the cost per foot is marginally higher because the ends require precision grinding, the versatility and long-term efficiency far outweigh the added expense.
The Solution: Request a “mathematical mix” from your supplier. A well-designed set should include segments in lengths of 10, 15, 20, 40, 50, 100, 200, 400, and 800mm. With this arrangement, operators can assemble any tool length from 10mm up to 3000mm in seconds. This not only extends the lifespan of your tooling, but also spreads wear evenly across the press brake bed—eliminating the need to cut into a $2,000 hardened steel bar.
At first glance, all surface-treated tools may appear identical—typically dark in color. But assuming they’re interchangeable can shorten their service life by up to 80%. The hardening method must be matched precisely to the material being formed to prevent premature wear.
Laser Hardened (Ideal for Stainless Steel): Laser hardening penetrates 2–3mm into the metal, creating a consistent hardened layer rated at 60 HRC. This depth is essential for stainless steel and other high-tensile alloys. Stainless steel is both tough and abrasive—it demands a deep, durable hardened zone to maintain tool integrity. Using shallow-hardened tooling on stainless will cause the tip to deform rapidly.
Nitrided (Best for Galvanized or Aluminum): Nitriding forms a thin (~0.3mm) but extremely hard surface layer—up to 70 HRC—with excellent lubricity. This treatment is the go-to choice for working with galvanized or aluminum sheet stock.
Caution: Avoid using Nitrided tools for heavy plate bending. Their hard outer layer is supported by a softer core; under high tonnage, the surface can fracture or flake away, much like a brittle eggshell.
The Remedy: Review your material inventory immediately. Assign galvanized jobs exclusively to Nitrided tooling, and ensure stainless steel applications use Laser Hardened tools. Choosing the correct hardening method isn’t an optional upgrade—it’s the key to stopping your tooling from becoming a disposable asset.
For more precision tooling options and to avoid these costly mistakes, visit JEELIX for a full catalog of solutions.
 العربية
 বাংলা
বাংলা
 Български
 Čeština
 Dansk
Dansk
 Nederlands
 Suomi
Suomi
 Français
 Deutsch
 Ελληνικά
 עִבְרִית
 हिन्दी
 Magyar
 Bahasa Indonesia
 Italiano
 日本語
日本語
 Қазақ тілі
 한국어
한국어
 Bahasa Melayu
 Norsk bokmål
 فارسی
فارسی
 Polski
 Português
 Română
 Русский
 Српски језик
 Slovenčina
 Español de México
 Español
 Kiswahili
 Svenska
 Tagalog
 தமிழ்
தமிழ்
 ไทย
ไทย
 Türkçe
 Українська
 اردو
اردو
 Tiếng Việt
 简体中文
简体中文
 香港中文
香港中文
 繁體中文
繁體中文
